Saturday, December 06, 2014
Remaking an Old Friend

Now, when I say very long ago, I mean about 35 years. And when I say very warm, I am talking double layers on the crown and 4-layers thick over the ears.
It's a perfect hat to wear while walking in the winter, or using the snow blower.
But, it's 35 years old and exhibiting some wear (especially at the color changes).

Here's the inside/reverse side.
I'm thinking that the inspiration (or more likely the pattern) was in a McCall's Needlework magazine from the 1970s. Back then, I was a blind follower.
And how is it that I can date this cap so precisely (or at least get in the circa for it)?
Note the lime green, burgundy, and cream yarn in the hat.
Now, lookie here:

The family Christmas stockings, pre-Purple Warrior Princess. The third stocking from the left is the first one I made. In 1977. To mark the birth of the PWP's daddy's first Christmas. Leftovers from that stocking and a sweater or two wound up in my hat!

And now, I am seriously due for a replacement.
Particulars:
Original: 4 stitches/inch, worsted weight ack, Bernat or Berella, most likely.
Replacement (eyes left): 5 stitches per inch Filatura Lanarota Puno (100% alpaca), so it will be thinner (I increased to more stitches) but at least as warm (probably downright hot).
I'll be throwing in some stripes of mulberry (for sure) and cream (probably) and charcoal and black (let's see how that goes!) for the reverse side.
Here's a recipe (reverse engineered from the original):
Materials: bunch of leftover yarn that goes together (or not). Appropriate size needles (I probably used 8's or 9's on the original. I'm definitely using 6's on the remake), set of dpns and a 16" circular.
Cast on 29 stitches. Join. (do I need to spell out the part about joining not twisting??)
Increase to 87 (worsted weight) or 116 (DK weight). (Work one round, then increase by kfb in each stitch to the end of the next round. Repeat these two rounds twice more for worsted and 3 times more for DK.)
Knit forever (24"). Decrease by k2 tog all the way around, knit one round even until you are back at 29 stitches (3 decrease rounds for worsted; 4 for DK). Draw up, fasten off. Fold double with the purl side out, tack the beginning to the end. Fold up a cuff.
Stay tuned. This may not last unworn until the fair in the late summer. If we have a repeat of last winter, I'll be wearing it by Christmas.
Labels: big people clothes, knit recipes, WIPs, yarn diet


Wednesday, February 05, 2014
More of the Same

Remember the shot of the deer from a couple weeks ago?
They're gone.
And in their place, we have. . .
SNOW!

And more of it!
This is the view from our front porch.
I wish I could say that it is melting, but no. Instead, there's a prediction of up to 1/2" of
Ice
To top it off.

Something warm and cozy is in order.
A new scrapghan to use up the odd bits of animal fiber yarn is currently On The Needles.
It's a wide swath of wool, llama, alpaca, angora, you know the drill. If it was previously on an animal's back (or front) it's fair game.
The Finished Object will be a hexagon as big as the needle (60" circular) allows.

Recipe is simple:
Using similar weight yarn and appropriate needles, CO 6 stitches and divide over 3 DPNs.
Join.
R2: increase in each stitch.
Knit 2 rounds, placing a marker between the 2nd and 3rd stitch on each needle on one of the rounds.
Next round, and every third round going on, increase at the beginning of each needle, before and after each marker, and at the end of each needle.
When there are too many stitches for the dpns, switch to a circular (probably a 24-29" to start, then later to a 60"), placing a marker between the stitches for each DPN. (6 markers)
Continue knitting, increasing before and after each marker every 3rd round until you run out of yarn, or space on the needle. Change stitches as desired. I threw in a purl round fairly often to make a thicker fabric and to help it lie flat. Finish with a deep garter stitch (k 1 round, p 1 round) border. Bind off loosely.
Mine is currently about 40" across (from point to point) and I am fast running out of room on the needle.
Labels: current events, knit recipes, pattern, WIPs
Saturday, January 08, 2011
That Mitered Square Blankie

There was a request for more info, so here it is:
I generally use size 7 needles with worsted weight when I blankie knit.
The squares in the most recent one (eyes left) are based on a 10 edge-stitch module, so, for the small squares, cast on 20, mark the center, and proceed. Bigger squares (the "unbleached muslin" ones) have an edge that is 3 times the small one, so 30 stitches on a side--cast on (or pick up) 60.
You can follow this recipe to make a 4-patch look-alike or to mimic any other quilt pattern (like Lights and Shadows/Around the World) that is based on patched squares. A Google "image" search on quilt patterns (or Around the World quilt pattern) provides lots of inspiration.
You can make the base squares bigger (I don't recommend smaller, even in heavier weight yarn--just too many bulky edges where you join).
I do recommend orienting the squares so that all the diagonals go in the same direction. I like it better that way, but you don't have to do that either.
Knitter's choice!
I generally use size 7 needles with worsted weight when I blankie knit.
The squares in the most recent one (eyes left) are based on a 10 edge-stitch module, so, for the small squares, cast on 20, mark the center, and proceed. Bigger squares (the "unbleached muslin" ones) have an edge that is 3 times the small one, so 30 stitches on a side--cast on (or pick up) 60.
You can follow this recipe to make a 4-patch look-alike or to mimic any other quilt pattern (like Lights and Shadows/Around the World) that is based on patched squares. A Google "image" search on quilt patterns (or Around the World quilt pattern) provides lots of inspiration.
You can make the base squares bigger (I don't recommend smaller, even in heavier weight yarn--just too many bulky edges where you join).
I do recommend orienting the squares so that all the diagonals go in the same direction. I like it better that way, but you don't have to do that either.
Knitter's choice!
Labels: knit recipes
Saturday, June 26, 2010
Same On Both Sides
Back while I was without technology, I worked up this sorta-design for a reversible dishcloth (or, with more yarn and more patience) scarf.
 As you can see, there's no right or wrong side.
Here's how to do it:
With dishcloth cotton for a cloth, or wool or something else suitable for a scarf, and appropriate needles, cast on multiple of 4 plus 2 plus 8 or 10 for a nice edging. [Here's my math: 4 X 8 = 32 + 2 = 34 + 10 = 44]
Seed stitch (Row 1: k1,p1 across; Row 2: p the k stitches, k the p stitches) for 4 rows.
Set up the pattern: keeping the edge stitches in seed stitch (in my example, the first and last 5 stitches) K2, P 2 across like this:
seed stitch 5, [K2, P2] to last 7 stitches, K2, seed stitch 5
Next row, and every row until the cloth/scarf is almost as long as you want it: Seed stitch 5, then for every k2, k the second stitch on the left needle, then the first stitch, p the p stitches, to the last 5 stitches, seed stitch 5.
When it's nearly square (or a nice long strip), seed stitch 4 rows and bind off in pattern.
The yarn I used was from a cone that originally looked like packing twine (yes, that pleasant a color!). I think it was Sugar n Cream. I dyed it with sassafras so that it's sort of the color of the froth on a nice cappuccino.
 As you can see, there's no right or wrong side.
Here's how to do it:
With dishcloth cotton for a cloth, or wool or something else suitable for a scarf, and appropriate needles, cast on multiple of 4 plus 2 plus 8 or 10 for a nice edging. [Here's my math: 4 X 8 = 32 + 2 = 34 + 10 = 44]
Seed stitch (Row 1: k1,p1 across; Row 2: p the k stitches, k the p stitches) for 4 rows.
Set up the pattern: keeping the edge stitches in seed stitch (in my example, the first and last 5 stitches) K2, P 2 across like this:
seed stitch 5, [K2, P2] to last 7 stitches, K2, seed stitch 5
Next row, and every row until the cloth/scarf is almost as long as you want it: Seed stitch 5, then for every k2, k the second stitch on the left needle, then the first stitch, p the p stitches, to the last 5 stitches, seed stitch 5.
When it's nearly square (or a nice long strip), seed stitch 4 rows and bind off in pattern.
The yarn I used was from a cone that originally looked like packing twine (yes, that pleasant a color!). I think it was Sugar n Cream. I dyed it with sassafras so that it's sort of the color of the froth on a nice cappuccino.
Labels: knit recipes
Sunday, October 19, 2008
A Variation On a Theme

I had a bunch of natural dishcloth cotton that I dyed with sassafras (see information on how I accomplished that here and here). It's a muddy beige color now and will probably fade with washing, but it seemed like reasonable stuff for experimentation.
Here's the pattern:
This bib is garter stitch (knit every row)
Cast on 20 stitches and knit one row.
Increase row, and every RS row: Knit 1 stitch, increase in next stitch, knit to second stitch from the end, increase in that stitch, knit 1 stitch.
WS: knit.
Repeat these 2 rows until there are 40 stitches on the needle (10 ridges, 20 rows completed) , knit even (no more increases) until there are 34 ridges (68 rows) total from the cast on edge.
Next RS row: Knit across 16 stitches. Bind off 8 stitches. Knit to the end of the row. Turn.
Decrease row, first side WS: Knit to the last 3 stitches (of the 16 before the bind off). Knit 2 together, knit 1.

RS: knit.
Repeat the last 2 rows until 10 stitches remain. Knit 6 rows even (3 ridges). Bind off in knit on WS. Cut yarn.
Join yarn at the neck edge of the second side.
Decrease row, second side WS: Knit 1, knit 2 together, knit to end of row.
RS: knit.
Repeat these 2 rows until 10 stitches remain. Knit 12 rows even (6 ridges).
Short row curve:
Next row (RS): knit 9 stitches. Turn, knit back.
Next row (RS): knit 8 stitches. Turn, knit back.
Continue in this way, working one less stitch each RS row and making a wedge that leans toward the neck edge until all stitches are worked. Knit across all 10 stitches.
Knit even for 12 rows (6 ridges) then repeat the Short Row Curve section.
Knit 16 rows (8 ridges) even.
Make a buttonhole: (RS) knit 4, bind off 2, knit 4. Turn (WS) Knit 4, cast on 2 (I used e-wrap cast on), knit 2.
Knit 4 rows (2 ridges) even.
Next (decrease) row (RS): Knit 1, knit 2 together, knit 4, knit 2 together, knit 1.
Knit 1 row.
Bind off (I bound off in purl).
Weave in all the ends. Sew on a cute button.

Labels: baby things, knit recipes
Sunday, March 30, 2008
Three For The Show

I did a little Ship Support knitting this month, in between finishing that afghan and making little things for the Tiny Prince.
The green and gold hat is the redo of the green and gold moccasins that gave me such fits.
The two solid color ones are textured (strictly for interest) and the blue one incorpoates an experiment at the decreases. (Click to make it bigger so you can see what I mean.)
I have always been bugged by ribbed and textured hat patterns that switch to plain stockinette stitch (knit all the stitches if working in the round) for the crown decreasing. It just looks Out Of Place if you know what I mean.
So I decided to try seed stitch (knit, purl around then purl the knits, knit the purls around, rinse, repeat) and at the decrease points, no matter where I was in the patterning, I knit the two stitches together. I really like the way it came out. The decrease stitches form a distinct line, the seed stitch echoes the pattern in the rest of the hat.
You're welcome!
I think I will cast on a pair of Mittnz now.
Labels: knit recipes, ship support
Thursday, January 10, 2008
Now the Hard Part

Quick. Before Second Slipper Syndrome kicks in! Make another one just like the other one. (For lots of knitters, this is the hardest part of all!)
This is my first one. All done except that I will either weave in the cuff ends or braid them. (Braid, I think.)
Oh, and finish the other one I've already started, of course.
Here's the scoop for other sizes cast on length/length of garter heel section/length from cast on edge to beginning of decreases (finished length)*:
Infant 4"/1.5"/2.5" (4")
Child 5"/2.5"/4" (5.5")
Large Child/Teen 6"/3.5"/5" (7")
Woman's Average 8"/4"/6" (8.5") This is my sample size.
Man's Large 11"/5.5"/
*If you have a real person in mind, by all means, measure and use those measurements! Remember that the decrease section (toe) will be 1.5-2.5" long depending on your repeat.
To make an eyelet round (for threading a cord) after a couple of garter rounds, k 2 together, yo around (on baby size) or k1, k2 together, yo, or even k2, k2 together, yo. You can control how many eyelets and how far apart they are. You will want an even number of holes! Use i-cord or a chained crochet cord. Or you could braid a cord using all of the colors. Thread it through the holes and tie in a bow.
To make a bobbled edge: On a multiple of 3 or 4 stitches, bind off 2 (3) preferably in purl, in the next stitch, knit 5 (or k 1, yo, k1, yo, k1), turn, k 5 (the 5 stitches you made from the 1), turn, purl 5, turn, knit 5, then slip the 2nd, 3rd, 4th, and 5th stitch over the first stitch (decreased back to 1 stitch), turn and bind off this stitch in purl. Slip the remaining stitch back to the right hand needle. Repeat all the way around.
Another interesting (kind of wavy without the bobbles--a bit more manly) edge: On a multiple of 3 or 4 stitches, bind off 2 (3) preferably in purl, in the next stitch, knit 5 (or k 1, yo, k1, yo, k1), then slip the 2nd, 3rd, 4th, and 5th stitch over the first stitch (decreased back to 1 stitch), turn and bind off this stitch in purl. Slip the remaining stitch back to the right hand needle. Repeat all the way around.
Labels: knit recipes
Wednesday, January 09, 2008
The Big Finish

Okay, you've decreased your toe and finished it off.
What's next?

Why, you need to seam up the heel.
Carefully stitch a back seam using any finish you like. (I sort of carefully whipped that seam together.) You can whip stitch, mattress stitch, slip stitch with a crochet hook. Just make sure that the seam is smooth. Otherwise, it won't be comfortable for your

Okay, time to try it on.
Remember that I told you the garter stitch would be stretchy? It is!
Time to decide.
Do you like the slipper with no cuff (eyes left).
It's actually pretty comfortable that way, but it's likely to be a little floppy.
I decided that a cuff was in order.

Cuff options: Ribbing. 1X1 will pull in, 2X2, not so much.
Corrugated ribbing (see my comments on a previous entry). This is so not an option as far as I am concerned.
Garter stitch? Maybe.
An eyelet round is good for little kid slippers to hold them on. (You'll need a string.)

Okay, I've decided that there will be a cuff. If this is your choice, pick up stitches around the top opening, 1 stitch per garter ridge and one for each cast on stitch.
If you are going to rib, you will want an appropriate number of stitches (multiple of 2 or 4). If you've chosen garter, anything goes.
If you're going to bobble, a multiple of 3 or 4 works well. You could probably also use a 5-stitch repeat.
Pick up that first round. If you are garter stitching, you'll knit and purl alternating rounds. Use some different colors (at least 3) that you've used in the foot. I'll be doing 3 garter rounds on these.
See you back here tomorrow for approximate measurements for other sizes (in case you don't have a little kid to measure) and recipes for bobbles and eyelets.
Labels: knit recipes
Tuesday, January 08, 2008
Knit Along With Me

Okay, night #2.
When your stripey heel part is as long as you need it (4" in my example for my personal foot), you will need to add a couple of stitches at the end of the last row (after you complete the wrong side row, either knit 2 or 4 more stitches onto the end of the row, or use an e cast on to add the stitches). This is the front of the foot part.
Cut the yarn leaving a tail about 6".
Tricky part coming up:

Divide the stitches somewhat evenly onto 3 double pointed needles.
You want the new cast on stitches in the center of the second needle. The beginning of the round is at the center of your original stripy part.
Attach a new color at the beginning of the round (bottom of the foot--that way any messy round joining things that you do will be on the walked on part, not the side or top.
Clever, no?

Find some patterny things that you can live with that divide evenly into the number of stitches you have and go to town with colors and such.
Have fun with this part!
I had 52 stitches. My first band was evenly divisible (4 stitches wide). The second one was 10 stitches wide, so I chose to knit the 2 extra stitches in the background color and "hide them" on the bottom of the foot.
(If I hadn't told you, you'd have never known!)
Keep knitting in bands of pattern until the moc is about 2" shorter than you want your finished slipper. Remember that garter stitch is v-e-r-y s-t-r-e-t-c-h-y so don't get carried away with the length!

Switch colors one more time and begin the toe decreases.
First round, decrease until you have an even multiple of 8, 9, or 10. (I decreased 2 stitches to get to 50.)
Then, decrease every row by knitting 2 less than your multiple (in my case 10-2 or 8) then knit 2 together. Repeat to the end of the round. Next round, knit 1 stitch less (7 in my case) before the knit 2 together. Keep going until you have 2 stitches left for each decreases set.
Cut the yarn with a 12" tail, thread a blunt needle, draw up the stitches and fasten off.
Weave your ends in and meet me back here tomorrow!

Sparky would like her fans to know that the medicine made her sick and so she got new medicine from her real vet.
And she met a puppy there.
And she's staying right here until she feels better.
Or forever, whichever comes first.
Could you turn out the light, please. It's in her eyes.
Labels: cats, knit recipes
Monday, January 07, 2008
Shall We Knit-A-Long?
For those of you who have expressed interest in learning how these moccasins are made, I am deconstructing the pattern and providing insights so that you can make your own.
It really isn't difficult.
If you'd like to knit along with me, please do.
You'll need several colors of worsted weight ack or wool or a blend. Cotton might work, but it won't be as warm. It's helpful if you have the ball band for at least one color, because it will give you a starting point for gauge. No matter what the suggested needle size, go down, down, down. My ball band says 17 stitches to 4" on size 8s. I'm shooting for 5.5-6 stitches to the inch and I'm using 5s.
You'll need straight needles and double points in the same size.

You will need:
A tape measure to measure the foot of yourvictim intended recipient.
Measure first, the distance from the middle of your inner ankle bone, down across the bottom of your heel, to the middle of your outer ankle bone.
Write down that number. (8)
Multiply that number by the stitches per inch you are aiming for (mine=6 so 8X6=48)
Cast on that many stitches loosely.

Then, to determine how long to make the stripey heel portion of your moccasin, measure again.
This time, from the middle of the back of the victim's heel across the middle of the ankle bone (not where the tape is showing in the photo! Up higher!!) to almost the center of the front of the foot.
That is how long you will be knitting the heel portion of the moccasin.
Decide what colors (as many as you want, but at least 2) to make the heel, and start garter stitching flat (knit every row.
Don't join yet. Don't slip the first stitch of the row, tempting as it is. That edge will be covered and the slip stitch will cause you grief down the road.

If you get to the end of your knitting, grab another pair of needles (same size) and start your second moc.
We'll come back to this KAL tomorrow, I promise with the join and knit in rounds.
Polish up your double points, you'll need them in the next step.
It really isn't difficult.
If you'd like to knit along with me, please do.
You'll need several colors of worsted weight ack or wool or a blend. Cotton might work, but it won't be as warm. It's helpful if you have the ball band for at least one color, because it will give you a starting point for gauge. No matter what the suggested needle size, go down, down, down. My ball band says 17 stitches to 4" on size 8s. I'm shooting for 5.5-6 stitches to the inch and I'm using 5s.
You'll need straight needles and double points in the same size.

You will need:
A tape measure to measure the foot of your
Measure first, the distance from the middle of your inner ankle bone, down across the bottom of your heel, to the middle of your outer ankle bone.
Write down that number. (8)
Multiply that number by the stitches per inch you are aiming for (mine=6 so 8X6=48)
Cast on that many stitches loosely.

Then, to determine how long to make the stripey heel portion of your moccasin, measure again.
This time, from the middle of the back of the victim's heel across the middle of the ankle bone (not where the tape is showing in the photo! Up higher!!) to almost the center of the front of the foot.
That is how long you will be knitting the heel portion of the moccasin.
Decide what colors (as many as you want, but at least 2) to make the heel, and start garter stitching flat (knit every row.
Don't join yet. Don't slip the first stitch of the row, tempting as it is. That edge will be covered and the slip stitch will cause you grief down the road.

If you get to the end of your knitting, grab another pair of needles (same size) and start your second moc.
We'll come back to this KAL tomorrow, I promise with the join and knit in rounds.
Polish up your double points, you'll need them in the next step.
Labels: knit recipes
Tuesday, April 03, 2007
Disappointing

Bubby ain't all that cute!
I tried to love him. I'm not even sure I like him. He just isn't growing on me at all!
He was supposed to be a fair entry, Toy, knitted, but right now, he's in the time-out box with the baby socks I keep for giving when I don't get a lot of notice that I need a little baby gift.
There's another box that holds the fair entries.
There's a washcloth in that box. It's all by itself.
Lonely.
Waiting for a Toy, knit.

I also use up the last of the Lion Bouclé. Thanks be to the FSM it's all gone! Pretty as it is, it's nasty to work with.
Two hats. Knit in the round. Gauge is about 2.5 st/in. Cast on 40 (raspberry) or 50 (blue lime). Join and knit in the round until you've made it high enough, or you nearly run out of yarn. Make 1 round of K 2 tog, yo, then at least 1 more round k around. Bind off. Thread a ribbon or i-cord or strand of crocheted chain through the eyelets.
Put it in the box for Dulaan. Make another. And another. Until you run out of Pretty But Nasty To Knit yarn
Labels: Dulaan, fair entry, knit recipes
Wednesday, March 21, 2007
Norma Said
I was whining over on Rabbitch's blog about how nobody every finds this space by Googling on weird phrases (like bunnie poop, poems about) and other equally exotic topics. Norma piped up to say that clearly, I was not engaging the right audience (okay, that's not exactly what she said--she said I need to cuss more) but dudes, several people who think I'm reasonably sane read this blog--for the knitting content, not the cussing. Really! (And I see them at work most days, too.)
For them that's here for the knitting, here's some knitting content.

This is how the Tomten looked before dinner tonight. (I've added a few rows since I took this shot).
If I can manage to get some work done on the taxes (federal, state, local) before it gets too late (in the evening, not in the filing season) tomorrow night I can probably get the rest of the way to the wrist and be ready to start the trim.
Question, though: Is this girl-side (big, white, with flowers painted on buttons ), or boy-side (white bears with blue polka dots and red bowties buttons)?
Decisions, decisions!
 And something in the way of car knitting.
For Rita (and for clarity): Cast on 200. place a marker between stitch 100 and stitch 101. On each right side row, knit 2 together on each side of the marker (2 decreases every other row, in other words). This will form a square with a diagonal of decreases. (Check the 4/10/05 archived entry for a photo of a finished one.)
I'll be using 3 colors of Lion Brand Boucle on this one.
Next Project?

Note: This one's for the fair.
I've decided that I would like something in the way of a shawl for myself in a relatively plain-stitch. I'm thinking top down would be good. Something like the one shown on 9/30/06, but in real hair of the mo.
I'm planning to let the yarn speakto me for itself.
Choices are (eyes left, please) Artful Yarns Portrait (colorway: Weeping Woman) which is an incredibly yummy (70 mo/ 25 viscose / 5 polyester) with wonderfully deep and rich colors that I would use with assorted vintage and newer mo d'stashes from Louet (turquoise, purple, mauve, etc.) and some unlabeled stuff that is just, well, better thansex chocolate.

The other choice I will admit that I originally though might become Charlotte's Web (JFIGI--the shawl, not the book!) and then thought better of it.
It's Plymouth Outback Mohair (70 mo/ 26 wool/ 4 nylon).I have 4 colorways stashed that range through the purples and teals.
This stuff is also incredible. The colors are much more subdued.
And so, I must decide. Do I wish to be garish and loud, or more ladylike?
Cat is shown strictly for scale. She has no interest whatever in mohair.
Now, for those who are here strictly for trash talking and cussing:
What in the holy hell is going on with our (US) government?
Have I heard correctly that the Executive Branch (which chose first to stack the Judicial Branch, then to gut it) is now telling the Legislative Branch (that is questioning these moves) that its questioning constitutes a breach of the Separation of Powers? Checks and Balances. Did they sleep through that lecture?
And at what point did the Attorney General stop being the top lawyer for the citizens and become the President's personal barrister? You're doing a heck of a job, Al.
Is someone sniffing the rubber cement?
For them that's here for the knitting, here's some knitting content.

This is how the Tomten looked before dinner tonight. (I've added a few rows since I took this shot).
If I can manage to get some work done on the taxes (federal, state, local) before it gets too late (in the evening, not in the filing season) tomorrow night I can probably get the rest of the way to the wrist and be ready to start the trim.
Question, though: Is this girl-side (big, white, with flowers painted on buttons ), or boy-side (white bears with blue polka dots and red bowties buttons)?
Decisions, decisions!
 And something in the way of car knitting.
For Rita (and for clarity): Cast on 200. place a marker between stitch 100 and stitch 101. On each right side row, knit 2 together on each side of the marker (2 decreases every other row, in other words). This will form a square with a diagonal of decreases. (Check the 4/10/05 archived entry for a photo of a finished one.)
I'll be using 3 colors of Lion Brand Boucle on this one.
Next Project?

Note: This one's for the fair.
I've decided that I would like something in the way of a shawl for myself in a relatively plain-stitch. I'm thinking top down would be good. Something like the one shown on 9/30/06, but in real hair of the mo.
I'm planning to let the yarn speak
Choices are (eyes left, please) Artful Yarns Portrait (colorway: Weeping Woman) which is an incredibly yummy (70 mo/ 25 viscose / 5 polyester) with wonderfully deep and rich colors that I would use with assorted vintage and newer mo d'stashes from Louet (turquoise, purple, mauve, etc.) and some unlabeled stuff that is just, well, better than

The other choice I will admit that I originally though might become Charlotte's Web (JFIGI--the shawl, not the book!) and then thought better of it.
It's Plymouth Outback Mohair (70 mo/ 26 wool/ 4 nylon).I have 4 colorways stashed that range through the purples and teals.
This stuff is also incredible. The colors are much more subdued.
And so, I must decide. Do I wish to be garish and loud, or more ladylike?
Cat is shown strictly for scale. She has no interest whatever in mohair.
Now, for those who are here strictly for trash talking and cussing:
What in the holy hell is going on with our (US) government?
Have I heard correctly that the Executive Branch (which chose first to stack the Judicial Branch, then to gut it) is now telling the Legislative Branch (that is questioning these moves) that its questioning constitutes a breach of the Separation of Powers? Checks and Balances. Did they sleep through that lecture?
And at what point did the Attorney General stop being the top lawyer for the citizens and become the President's personal barrister? You're doing a heck of a job, Al.
Is someone sniffing the rubber cement?
Labels: baby things, current events, knit recipes
Tuesday, January 23, 2007
State of the Onion

It has been a particularly bad day, long week (what do you mean it's only Tuesday?!) so I was tickled pink to be greeted by the cat poses that you see here.
See the feet and the tiny hand?
For the full picture, check the archives. August 24, 2006 to be exact.

Here's another shot.
Same cat. Same voodoo doll.
No pins needed.
We aren't watching.
And here's a hat for a Tuesday night:
 Size 11, 16" circulars. Less than a ball of Lion Boucle (leftovers from the Sunday Sweater). Crochet hook for chaining.
1) Make a chain about 10" long. Set aside.
2) Cast on 42 stitches, join, etc.
3) Knit around and around until the piece is 6" long.
4) K 2 together, YO, all the way around.
5) Knit 2 more rounds (or 3 if there's enough yarn left).
6) Bind off.
7) Weave in the ends. Thread the chain through the eyelets. Draw up. Tie a knot. Make a bow.
All done.
Total knit time, about 90 minutes. You're welcome.
Labels: knit recipes
Monday, January 22, 2007
Sunday Sweater Vest
Yes, I know it's Monday. I did that work thing today.
Sunday Sweater Vest (named thus because that’s when and how long I knat upon it)
Toddler size 2/4--24" chest
Materials: 3 balls of Lion Brand Bouclé (57 yards/52 meters to 2.5 oz./70g--79% acrylic/20% mohair/1% nylon). Pattern uses only a small part of the third ball. Substitute any nubby yarn that knits at the same gauge.
16" circular size 8
24" circular size 11
crochet hook size J/10 (6 mm)
Gauge: 3 stitches/1"
With size 8 16" needle, cast on 70 stitches. Join, rib for 4 rounds (about 1").
Switch to size 11 24" circular and knit for 7.5". On last round place 2 markers, 35 stitches apart.
Next round, beginning 2 stitches before each marker, bind off 4 stitches for underarm. (2 sets of 31 stitches remain separated by 4 bound off stitches.)
Back: Working only on one set of 31 stitches between the bound off stitches, work back and forth (k 1 row, p 1 row). Bind off 2 stitches at the beginning of each of the next 2 rows. (27 stitches remain in this section).
Knit until back above first set of bound off stitches is 6.25", ending on RS row.
Next row (WS) Purl across 8 stitches, Bind off next 11 stitches. Purl across 8 stitches. Place the open stitches on holders (a spare circular needle or 2 pieces of yarn.
Front (left side as sweater is worn): Join yarn at armhole. Bind off two stitches at the beginning of this and next row.
Next row (RS): Knit 11, knit 2 together. Place next stitch on a holder (safety pin). Turn and knit back. Decrease at neck side of front on right side, 4 more times. Knit remaining 8 stitches even until armhole length is same as back.
Turn piece inside out and execute 3-needle bind off on these 16 (8 pairs of) stitches.
Front (right side as worn): join yarn at center front, knitting first 2 stitches together. Repeat decreases at beginning of right side row 4 more times. Continue knitting the remaining 8 stitches as for left side until front and back armholes are the same length. Use three needle bind-off to join front and back as for left side.
Armhole and neck edges: With crochet hook, and right side facing, work single crochet loosely around armholes, beginning and ending at back edge of underarm. Beginning and ending at left shoulder work single crochet around neck edge, picking up the center front stitch.
Weave in ends.
© Ann McManus 2007
Sunday Sweater Vest (named thus because that’s when and how long I knat upon it)
Toddler size 2/4--24" chest
Materials: 3 balls of Lion Brand Bouclé (57 yards/52 meters to 2.5 oz./70g--79% acrylic/20% mohair/1% nylon). Pattern uses only a small part of the third ball. Substitute any nubby yarn that knits at the same gauge.
16" circular size 8
24" circular size 11
crochet hook size J/10 (6 mm)
Gauge: 3 stitches/1"
With size 8 16" needle, cast on 70 stitches. Join, rib for 4 rounds (about 1").
Switch to size 11 24" circular and knit for 7.5". On last round place 2 markers, 35 stitches apart.
Next round, beginning 2 stitches before each marker, bind off 4 stitches for underarm. (2 sets of 31 stitches remain separated by 4 bound off stitches.)
Back: Working only on one set of 31 stitches between the bound off stitches, work back and forth (k 1 row, p 1 row). Bind off 2 stitches at the beginning of each of the next 2 rows. (27 stitches remain in this section).
Knit until back above first set of bound off stitches is 6.25", ending on RS row.
Next row (WS) Purl across 8 stitches, Bind off next 11 stitches. Purl across 8 stitches. Place the open stitches on holders (a spare circular needle or 2 pieces of yarn.
Front (left side as sweater is worn): Join yarn at armhole. Bind off two stitches at the beginning of this and next row.
Next row (RS): Knit 11, knit 2 together. Place next stitch on a holder (safety pin). Turn and knit back. Decrease at neck side of front on right side, 4 more times. Knit remaining 8 stitches even until armhole length is same as back.
Turn piece inside out and execute 3-needle bind off on these 16 (8 pairs of) stitches.
Front (right side as worn): join yarn at center front, knitting first 2 stitches together. Repeat decreases at beginning of right side row 4 more times. Continue knitting the remaining 8 stitches as for left side until front and back armholes are the same length. Use three needle bind-off to join front and back as for left side.
Armhole and neck edges: With crochet hook, and right side facing, work single crochet loosely around armholes, beginning and ending at back edge of underarm. Beginning and ending at left shoulder work single crochet around neck edge, picking up the center front stitch.
Weave in ends.
© Ann McManus 2007
Labels: knit recipes
Thursday, December 14, 2006
Ready to Mail

I'm pretty sure that I announced (at least to the postal clerk) that all of my Christmas packages were mailed thankyouverymuch.
I never said anything about Solstice or Hanukkah, though!
Presenting, the Hanukkah
Knit of Bernat Ping Pong (which is remarkably soft, though it looks like it would be scratchy as all get out). Just sparkly enough.
A seat of the pants sort of hat.
The eyes are buttons, white, layered with black. The nose is embroidered.
Hat Recipe: Body:On size 7s: Cast on 72, join. Make a cuff of 3X1 ribbing for about an inch. Switch it stockinette and knit until there's 5" from the beginning. Decrease (I did it at 9 points) every other row, draw up, fasten off.
Ears: Cast on 12 stitches. SS for 6 rows. Decrease each side EOR twice, then 1 more time (6 st). Knit 2 rows even. Increase each side EOR twice, then once more. SS for 7 rows (yes, it will be longer on one side. That's the back.) Bind off. Sew side seams. Make another unless this is a bear with issues.
Ear placement: Move 'em around. Try different places. I deliberately chose to cock the head. I think it looks cute that way. Less rigid. Stitch the ears in place.
Eyes: I used buttons (7/8" white, 5/8" black) and layered them. You could embroider the eyes instead, or use just the black buttons. Bears have big eyes. (Because I said so.)
Mouth and nose: check out a manufactured Teddy. Copy it! (or not) I embroidered the nose and mouth with black yarn.
Make sure that everything is fastened off securely!
There may be another post later today if there's anything to report.
(I still have 5 balls of Ping Pong left. I am thinking about dumping them. Just sayin')
Labels: knit recipes
Friday, December 09, 2005
Enough
The third (of many) scarves is finished. It's a lengthwise garter stitch in rainbow (Mexicana) Red Heart ack that was nearly a full skein. I used a bit of black for a center stripe (also Red Heart ack) because I feared I would run out of the rainbow. As luck would have it, there's a couple yards left, so I was right--there wasn't enough. A single full skein would have been sufficient, if I had only had one! But I'm not buying yarn right now.
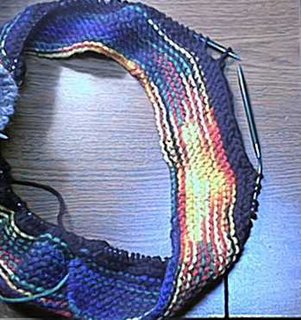
You'll notice that there's an obvious change of yarn color, that doesn't factor in to anything except as I was balancing the stripes. You could use all one color, switch colors every row (or every other row), or do as I did, and make three fairly wide stripes. You could even be more subtle about the color change(s).
I used about 3 ounces of worsted weight yarn. Using a size 10 (US) circular needle (it's getting quite a workout, no?) cast on 142 stitches. Do not join. Knit every row (garter stitch) for 20 rows (10 ridges).
Next row, knit 36, bind off the next 16 stitches, knit to the end of the row.
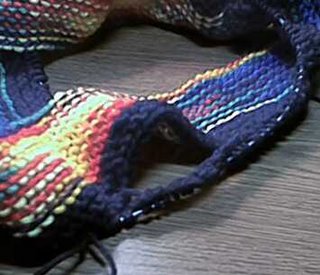
Turn and knit back to the bound off section (90 stitches). Cast on 16 stitches. Use any cast on that will give a fairly firm edge. (I knitted that cast on, but I suppose an 'e' loop cast on would work too.) Knit to the end of the row.
Work another 20 rows of garter stitch.
Bind off loosely. Weave in any ends.
finished width=5"
finished length=42"
slot starts about 10" from the edge and is about 4" long.
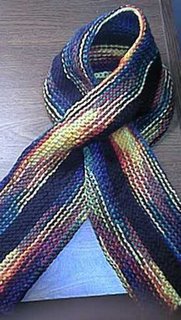
Thread end through slot made by the bind off, cast on.
Now, if I didn't have Christmas projects to finish (and in some cases start and finish), I'd make a few more of these. It was about a 2-day project with other stuff intermingled. Perfect riding/TiVo watching stuff.
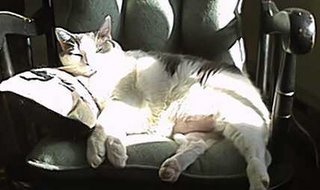
Some of us know how to spend a snow day better than others:
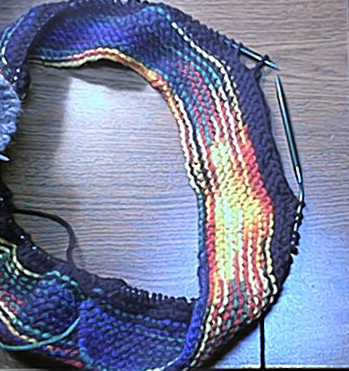
You'll notice that there's an obvious change of yarn color, that doesn't factor in to anything except as I was balancing the stripes. You could use all one color, switch colors every row (or every other row), or do as I did, and make three fairly wide stripes. You could even be more subtle about the color change(s).
I used about 3 ounces of worsted weight yarn. Using a size 10 (US) circular needle (it's getting quite a workout, no?) cast on 142 stitches. Do not join. Knit every row (garter stitch) for 20 rows (10 ridges).
Next row, knit 36, bind off the next 16 stitches, knit to the end of the row.
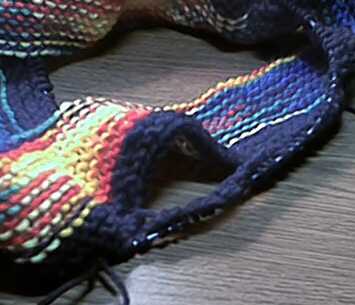
Turn and knit back to the bound off section (90 stitches). Cast on 16 stitches. Use any cast on that will give a fairly firm edge. (I knitted that cast on, but I suppose an 'e' loop cast on would work too.) Knit to the end of the row.
Work another 20 rows of garter stitch.
Bind off loosely. Weave in any ends.
finished width=5"
finished length=42"
slot starts about 10" from the edge and is about 4" long.
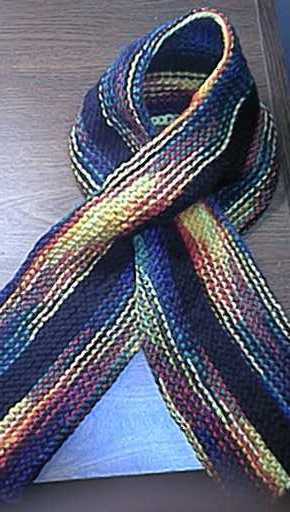
Thread end through slot made by the bind off, cast on.
Now, if I didn't have Christmas projects to finish (and in some cases start and finish), I'd make a few more of these. It was about a 2-day project with other stuff intermingled. Perfect riding/TiVo watching stuff.
Some of us know how to spend a snow day better than others:

Labels: knit recipes
Wednesday, December 07, 2005
Patterns
I finished another little scarf for the reservation and just has to share the recipe. It took me a couple of days, working on it between other projects (they're coming along nicely).
I used worsted weight yarn and size 10 needles. (Yes, they are bigger than the ball band suggests, I wanted a soft, squishy fabric.) The yarn is Bernat Ragg and I am nearly out (and it is very discontinued).

It starts out like the basic dishcloth: Cast on 3 stitches. Knit one row.
Then, using your favorite increase, increase 1 stitch at the beginning of the row. I used kfb (knit front and back). Knit to the end.
Repeat this row until you have 32 stitches.
Work even (knit every row) for 30 rows (15 ridges).
Switch to ribbing (knit 1, p1, repeat across row) and knit in ribbing for 2". You'll notice that the ribbing pulls the garter stitch in a bit.
 Next, split the ribbing in half. Knit across 16 stitches, keeping the k1, p1 ribbing.
Join a new ball of yarn (or the opposite end of the ball you are using). To do this, just stop knitting with the working end that's attached to your knitting and start knitting with a new working end.
Work each half (16 stitches) independently until you have 2" worked (a total of 4 ribbed inches). Using the yarn attached at the outer edge, rib across all the stitches. Cut the extra yarn (the one attached in the middle), leaving a tail about 6-8" long (you'll weave this in later).

Continue ribbing for an additional length that is long enough to go around the neck of your victim (er, recipient) comfortably. (I continued for an additional 18" for a total ribbed section of 22"), then resume knitting in garter stitch (k every row).
You want to duplicate the shaping on the other end, so work in garter stitch for 30 rows (15 ridges).
Next, decrease 1 stitch at the beginning of every row, using a decrease that matches your increased (in other words, if you used a yo increase at the beginning, you'll use a yo decrease at this end). In the model: k1, k2 tog, k to end, repeat, until 3 stitches remain. (I like to do my decreases 1 stitch in from the edge. It makes a smoother edge.) Bind off.
Weave in all ends neatly. Slip the end of the scarf through the slit created at the one end of the ribbing:

Take obligatory shot in the bathroom mirror.
Note: mission accomplished. It's nice and toasty and stays in place.
Note #2: It's a little thick and wide for a child. Perhaps an increase to 28 stitches on would be better.
Note 3: It looks a little "girly." Next one: Start with a cast on of the number of stitches desired (28, 32, 36--a multiple of 4 is needed to make the "split" work well) and skip the increases/decreases.
Note 4: the important one! This is my pattern (not my concept, lord knows, but my words and my photos).
If you want to make them for charity, family, friends, or yourself, be my guest. If you want to make them for sale, that's probably all right, too, but please ask. I may request that you make a small monetary donation to the nearest soup kitchen or emergency pantry for every one you sell. Be fair.
.
I used worsted weight yarn and size 10 needles. (Yes, they are bigger than the ball band suggests, I wanted a soft, squishy fabric.) The yarn is Bernat Ragg and I am nearly out (and it is very discontinued).

It starts out like the basic dishcloth: Cast on 3 stitches. Knit one row.
Then, using your favorite increase, increase 1 stitch at the beginning of the row. I used kfb (knit front and back). Knit to the end.
Repeat this row until you have 32 stitches.
Work even (knit every row) for 30 rows (15 ridges).
Switch to ribbing (knit 1, p1, repeat across row) and knit in ribbing for 2". You'll notice that the ribbing pulls the garter stitch in a bit.
 Next, split the ribbing in half. Knit across 16 stitches, keeping the k1, p1 ribbing.
Join a new ball of yarn (or the opposite end of the ball you are using). To do this, just stop knitting with the working end that's attached to your knitting and start knitting with a new working end.
Work each half (16 stitches) independently until you have 2" worked (a total of 4 ribbed inches). Using the yarn attached at the outer edge, rib across all the stitches. Cut the extra yarn (the one attached in the middle), leaving a tail about 6-8" long (you'll weave this in later).
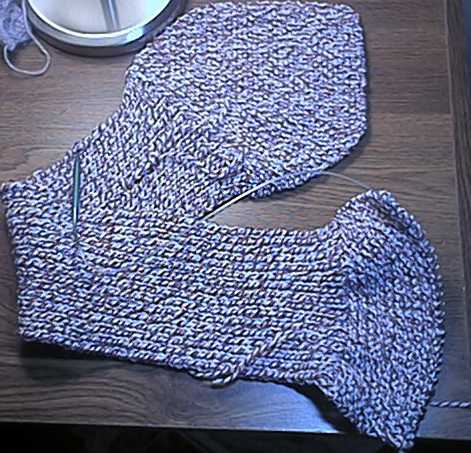
Continue ribbing for an additional length that is long enough to go around the neck of your victim (er, recipient) comfortably. (I continued for an additional 18" for a total ribbed section of 22"), then resume knitting in garter stitch (k every row).
You want to duplicate the shaping on the other end, so work in garter stitch for 30 rows (15 ridges).
Next, decrease 1 stitch at the beginning of every row, using a decrease that matches your increased (in other words, if you used a yo increase at the beginning, you'll use a yo decrease at this end). In the model: k1, k2 tog, k to end, repeat, until 3 stitches remain. (I like to do my decreases 1 stitch in from the edge. It makes a smoother edge.) Bind off.
Weave in all ends neatly. Slip the end of the scarf through the slit created at the one end of the ribbing:
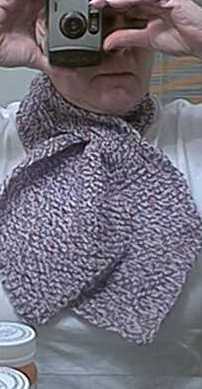
Take obligatory shot in the bathroom mirror.
Note: mission accomplished. It's nice and toasty and stays in place.
Note #2: It's a little thick and wide for a child. Perhaps an increase to 28 stitches on would be better.
Note 3: It looks a little "girly." Next one: Start with a cast on of the number of stitches desired (28, 32, 36--a multiple of 4 is needed to make the "split" work well) and skip the increases/decreases.
Note 4: the important one! This is my pattern (not my concept, lord knows, but my words and my photos).
If you want to make them for charity, family, friends, or yourself, be my guest. If you want to make them for sale, that's probably all right, too, but please ask. I may request that you make a small monetary donation to the nearest soup kitchen or emergency pantry for every one you sell. Be fair.
.
Labels: knit recipes
Monday, October 17, 2005
All Mine to Give
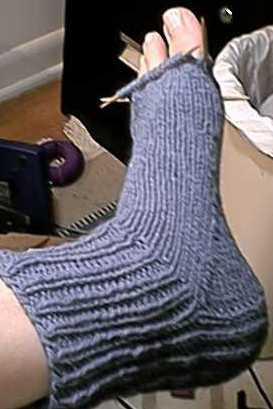
A repeat of part of the last installment: Continue knitting in even rounds (no increase or decrease) until sock is nearly as long as you want it. (In my case, I continued until the length from the back of the heel to my needle was 9". The toe decreases will add a scant inch to the length, so don't scrimp!)
If you are careful, you can try the sock on at this point. Note: The length that it is on my personal foot is too short! It shouud hit the "knuckle " of your big toe without stretching.

Decrease for the toe: Decrease for toe: K across needle 1 to 3 stitches from the end, skp, k 1. K 1, k2 together, K across needle 2 to 3 stitches from the end, skp, k 1. K 1, k2 together,K across needle 3 to the end.
Repeat this round until 8 stitches remain. Cut yarn about 6" long. Thread yarn needle and draw through the remaining 8 stitches. Repeat; fasten off.
(If you are feeling ambitious, you can graft the toe instead.)

Make another.
Note: Do not fall victim to dreaded SSS (Second Sock Syndrome, a varient of SMS --Second Mitten Syndrome)!

There was not a lot of yarn left from my 50g ball (110 yards) of Cervinia Sorrento.
.
Labels: knit recipes


![[HeettheFeet20083.jpg]](https://blogger.googleusercontent.com/img/b/R29vZ2xl/AVvXsEiCRH_T42wVcDuEXnRRcJTi8Xx0pZMjwaEvKKUYxkKGb3RbfVJvbBKJaplnruL4Y1lQGy9LWjb2KhOsPi10kdPRppP6_O47YprEco3m4iD3JMmT1o-7Hc6zuCWJT-0gxesUCp_H/s1600/HeettheFeet20083.jpg)
![[mittnz2008buttin.jpg]](https://blogger.googleusercontent.com/img/b/R29vZ2xl/AVvXsEjhkbBquqYIEHAWQxsnQtaptULuJ-jj-mlpdjbffH9r1n1liR1r8yRRkXMgJLBxbeo0x3w2wU_gLhjFzrxzKrMmVgUGSqAzkP89jlWOA04Xhr2pWmVGIDgt8VGWAK-FZMfwB6j6/s1600/mittnz2008buttin.jpg)
![[heet2009-1.jpg]](https://blogger.googleusercontent.com/img/b/R29vZ2xl/AVvXsEi4SiW5ds26X6RV2guuohZ5nCdtljV9Pj8cVQCebCBg8EYaQR_DXHlIgLihx-5ddowYTS8hM11_JCwqlbN0qLGhUHjIsea9xw5v9tu4Cdnn0dHCRU5NXLAN-VH_o7jT1WW3w74R_w/s320/heet2009-1.jpg)
![[mittnz 2009 button.jpg]](https://blogger.googleusercontent.com/img/b/R29vZ2xl/AVvXsEjpuGtaAayAUpfk3b8FnVyyIvB5jI1YxPMmcN2M9PyQo9MfDK9JVxgFz2z7rLFuGjebz7CBV-frRyUYMXFzFLmwtP_xmCwd9HEgKylZaZwzwfSV8xTZ5a6vayaG0oEbFxgjYFTa5w/s320/mittnz+2009+button.jpg)
