Monday, October 10, 2005
Never Put It In Writing
The sun came up again today. The damage was negligible. My basement is drying out (sort of) and only a relatively small amount of rain is predicted. Life is good.
And now, as promised, the beginnings of a pair of toasty warm bed socks. There's a bit of assumption here, that you might possibly have tackled a sock in the past, and that you have at least a passing acquaintance with double pointed needles. If either or both of these assumptions is wrong, well, it wouldn't be the first time! If you've never socked and never double-pointed, well there's a first time for everything!
Grab your needles and let's get started!
Materials: 3.5-4 ounces of worsted weight yarn. Machine washable/dryable is preferred. Set of 4 double pointed needles in a size that gives you a nice, firm fabric. (I used size 5.) You'll need a tapestry needle when we finish the toe(s).
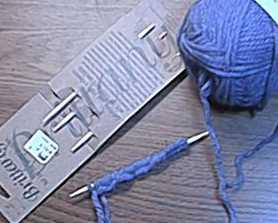
Cast on 36 stitches loosely onto one of the double pointed needles. I sometimes cast on firmly over 2 needles held together. This gives an even cast on edge without being tight.
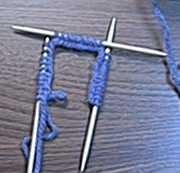
Slide 12 stitches from the cast on needle onto each of 2 free needles. You will have 12 stitches (3 X 12 = 36) on each of 3 needles.
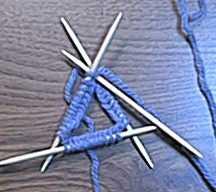 Form a triangle with the 3 needles. Make sure that all your stitches "face" the same way (see how the cast on "braid" is to the inside on all 3 needles??). Make sure you don't have a twist in your stitches. This is the part of most circular patterns where it says "join, being careful not to twist." That's what that direction means! "Join" by using your spare needle (the one with no stitches on it) as your "right needle" and insert it into the stitch at the end that does not have the working yarn attached. Make a stitch. Knit and purl (1 X 1 rib) across the first needle, then the second, then the third. Tighten up your stitches just a bit as you cross over between the needles. If there's a "ladder," don't worry. Washing will even your stitches up a lot.
I find that it's easier (less entanglement) for me to put the "new" working needle on top of the "old" working needle (the one I just knit the stitches from).
It helps to remember that you are never working with more than one pair of needles at a time. It just feels like juggling a porcupine.

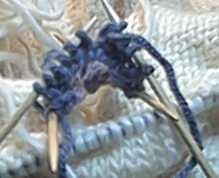
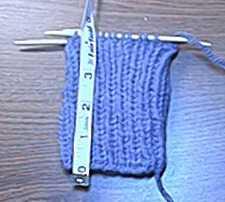
Rib in k1, p1 ribbing for 24 rounds (about 4").
(You can rib for 2" and make little "golf footies" or 8" and make a regular sock.)
You can use 1X1, 2X2, 3X1, or 1X3 ribbing, just make sure that you are dividing evenly into the number of stitches you cast on.
Okay, that's it for today. Meet me back here tomorrow and we'll start the heel flap.
.
And now, as promised, the beginnings of a pair of toasty warm bed socks. There's a bit of assumption here, that you might possibly have tackled a sock in the past, and that you have at least a passing acquaintance with double pointed needles. If either or both of these assumptions is wrong, well, it wouldn't be the first time! If you've never socked and never double-pointed, well there's a first time for everything!
Grab your needles and let's get started!
Materials: 3.5-4 ounces of worsted weight yarn. Machine washable/dryable is preferred. Set of 4 double pointed needles in a size that gives you a nice, firm fabric. (I used size 5.) You'll need a tapestry needle when we finish the toe(s).

Cast on 36 stitches loosely onto one of the double pointed needles. I sometimes cast on firmly over 2 needles held together. This gives an even cast on edge without being tight.

Slide 12 stitches from the cast on needle onto each of 2 free needles. You will have 12 stitches (3 X 12 = 36) on each of 3 needles.
 Form a triangle with the 3 needles. Make sure that all your stitches "face" the same way (see how the cast on "braid" is to the inside on all 3 needles??). Make sure you don't have a twist in your stitches. This is the part of most circular patterns where it says "join, being careful not to twist." That's what that direction means! "Join" by using your spare needle (the one with no stitches on it) as your "right needle" and insert it into the stitch at the end that does not have the working yarn attached. Make a stitch. Knit and purl (1 X 1 rib) across the first needle, then the second, then the third. Tighten up your stitches just a bit as you cross over between the needles. If there's a "ladder," don't worry. Washing will even your stitches up a lot.
I find that it's easier (less entanglement) for me to put the "new" working needle on top of the "old" working needle (the one I just knit the stitches from).
It helps to remember that you are never working with more than one pair of needles at a time. It just feels like juggling a porcupine.
Rib in k1, p1 ribbing for 24 rounds (about 4").
(You can rib for 2" and make little "golf footies" or 8" and make a regular sock.)
You can use 1X1, 2X2, 3X1, or 1X3 ribbing, just make sure that you are dividing evenly into the number of stitches you cast on.
Okay, that's it for today. Meet me back here tomorrow and we'll start the heel flap.
.
Labels: knit recipes
Comments:
Post a Comment
<< Home

<< Home
![]()


![[HeettheFeet20083.jpg]](https://blogger.googleusercontent.com/img/b/R29vZ2xl/AVvXsEiCRH_T42wVcDuEXnRRcJTi8Xx0pZMjwaEvKKUYxkKGb3RbfVJvbBKJaplnruL4Y1lQGy9LWjb2KhOsPi10kdPRppP6_O47YprEco3m4iD3JMmT1o-7Hc6zuCWJT-0gxesUCp_H/s1600/HeettheFeet20083.jpg)
![[mittnz2008buttin.jpg]](https://blogger.googleusercontent.com/img/b/R29vZ2xl/AVvXsEjhkbBquqYIEHAWQxsnQtaptULuJ-jj-mlpdjbffH9r1n1liR1r8yRRkXMgJLBxbeo0x3w2wU_gLhjFzrxzKrMmVgUGSqAzkP89jlWOA04Xhr2pWmVGIDgt8VGWAK-FZMfwB6j6/s1600/mittnz2008buttin.jpg)
![[heet2009-1.jpg]](https://blogger.googleusercontent.com/img/b/R29vZ2xl/AVvXsEi4SiW5ds26X6RV2guuohZ5nCdtljV9Pj8cVQCebCBg8EYaQR_DXHlIgLihx-5ddowYTS8hM11_JCwqlbN0qLGhUHjIsea9xw5v9tu4Cdnn0dHCRU5NXLAN-VH_o7jT1WW3w74R_w/s320/heet2009-1.jpg)
![[mittnz 2009 button.jpg]](https://blogger.googleusercontent.com/img/b/R29vZ2xl/AVvXsEjpuGtaAayAUpfk3b8FnVyyIvB5jI1YxPMmcN2M9PyQo9MfDK9JVxgFz2z7rLFuGjebz7CBV-frRyUYMXFzFLmwtP_xmCwd9HEgKylZaZwzwfSV8xTZ5a6vayaG0oEbFxgjYFTa5w/s320/mittnz+2009+button.jpg)