Saturday, February 23, 2008
Making Life a Little Easier
This one's for the "joiners" and the scrapghan makers!
I honed a tool I've been using for a while to help me with the Point of Contact (POC) afghan joining, and let me tell you, this has made life a whole bunch easier.
If you are a tactile person, this technique may mot be for you, but after a week of On-The-Floor crawling around to serve the Tiny Prince, I can tell you that these knees no longer crawl all that well!
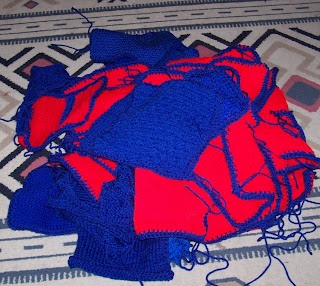
First up, traditional method of setting afghan squares into place:
First
(okay, second. First is edging them all with a round of something--I used half-double crochet)
you spill them onto the floor.
Vacuuming first is optional, though recommended.
No, I didn't. Why?
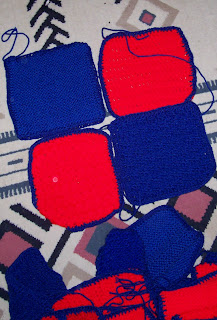
Then you get onto the floor and start moving them around into a pleasing pattern.
Then you shift them.
Then you move them again.
And again.
And possibly, again.
All the while, cursing that youwere too cheap to didn't buy rug padding.
Ibuprofen will be served after.
There is a better way!
And if you are reading this, it involves tools you already have (probably) at your very fingertips!
Excel, my sisters and brothers! Tool ofthe debbilMicrosquish. (any spreadsheet program that is installed on your machine will work. I happen to be Excel-literate or thought I was until we installed the latest version which has so damned many new features as to overwhelm the casual user, but I digress).
::ahem::
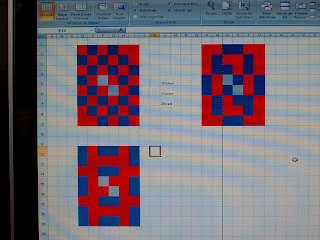
Okay, open up Excel your spreadsheet program!
See all those cute little squares (okay, rectangles)?
You can manipulate the size of those puppies through the "format" tab. I changed them to square by setting the Column Width to 4.57 and the Row Height to 35. That gave me nice square squares. Your mileage (and your version) may vary, so be prepared to play around a bit.
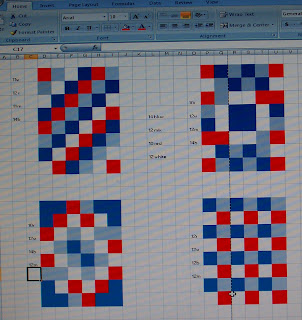
Next, figure out how many squares of each color you have to work with (I counted, then jotted that number on the spreadsheet)and start playing with the "fill" function. Fill will generally allow you to pick through (at the very least) the basic "crayon" colors. Some versions have subtle variations. Go crazy, here. You aren't marryingthe colors!
If you have a color printer (I don't) you can go nuts with intense colors. If you are limited to black on white printing (like I am) you might consider using less intense color, but more obvious "shades" so that when you print (assuming you plan to) you will be able to tell one color from the other.
You can save your doodling and come back to it later (that's what I did), or print it out (assuming that you have a color printer). I plan to work right from the screen.
Or, you can print it out on your black and white printer and use your trusty colored pencils (or crayons) to indicate colors (I've done that, too).
For the red and blue 'ghan (with two "duo-colored accents" that aren't as abrupt as they look in the graph), I'll be using the layout in the upper left.
The jury's still out on the red/white/blue one (since I haven't edged the squares yet). A couple of these layouts use exactly the number of squares I have on hand. One (upper left) requires that I make 2 more red squares before I start joining.
The whole process is lots of fun! And sure beats crawling around on the floor.
You're welcome.
I honed a tool I've been using for a while to help me with the Point of Contact (POC) afghan joining, and let me tell you, this has made life a whole bunch easier.
If you are a tactile person, this technique may mot be for you, but after a week of On-The-Floor crawling around to serve the Tiny Prince, I can tell you that these knees no longer crawl all that well!

First up, traditional method of setting afghan squares into place:
First
(okay, second. First is edging them all with a round of something--I used half-double crochet)
you spill them onto the floor.
Vacuuming first is optional, though recommended.
No, I didn't. Why?

Then you get onto the floor and start moving them around into a pleasing pattern.
Then you shift them.
Then you move them again.
And again.
And possibly, again.
All the while, cursing that you
Ibuprofen will be served after.
There is a better way!
And if you are reading this, it involves tools you already have (probably) at your very fingertips!
Excel, my sisters and brothers! Tool of
::ahem::
Okay, open up
See all those cute little squares (okay, rectangles)?
You can manipulate the size of those puppies through the "format" tab. I changed them to square by setting the Column Width to 4.57 and the Row Height to 35. That gave me nice square squares. Your mileage (and your version) may vary, so be prepared to play around a bit.
Next, figure out how many squares of each color you have to work with (I counted, then jotted that number on the spreadsheet)and start playing with the "fill" function. Fill will generally allow you to pick through (at the very least) the basic "crayon" colors. Some versions have subtle variations. Go crazy, here. You aren't marryingthe colors!

If you have a color printer (I don't) you can go nuts with intense colors. If you are limited to black on white printing (like I am) you might consider using less intense color, but more obvious "shades" so that when you print (assuming you plan to) you will be able to tell one color from the other.
You can save your doodling and come back to it later (that's what I did), or print it out (assuming that you have a color printer). I plan to work right from the screen.

Or, you can print it out on your black and white printer and use your trusty colored pencils (or crayons) to indicate colors (I've done that, too).
For the red and blue 'ghan (with two "duo-colored accents" that aren't as abrupt as they look in the graph), I'll be using the layout in the upper left.
The jury's still out on the red/white/blue one (since I haven't edged the squares yet). A couple of these layouts use exactly the number of squares I have on hand. One (upper left) requires that I make 2 more red squares before I start joining.
The whole process is lots of fun! And sure beats crawling around on the floor.
You're welcome.
Labels: planning, ship support
Comments:
<< Home
You are one of the most industrious people I've ever encountered. Clever, too.
Kathy
Kathy
# posted by  : 10:39 AM
: 10:39 AM
Thanks! Isn't Excel great for things like this?
I must confess that last time I joined up squares (12" squares) I took pictures of each one with my digital camera, printed them out, cut them out and shuffled them around.
I must confess that last time I joined up squares (12" squares) I took pictures of each one with my digital camera, printed them out, cut them out and shuffled them around.

This is another great use--we used the same technique when we changed the bathroom tile around the new one knob (control) for the shower. Because we went from 2 (hot and cold) faucet handles to the one center one, it was necessary to change and add another tile color, The compute program was the fastest way to find a pattern that looked good!!
# posted by : 4:05 PM
: 4:05 PM
This is such a cool idea! Not that I have any squares to piece together, but hey - I love to learn new stuff and will be filing this away for possible future reference.
I'm sorry to tell you that I like the one on the upper left best.
Start a-knittin'. Or, you know, choose another one :)
Start a-knittin'. Or, you know, choose another one :)
I'm a bit embarassed that I never thought of doing this. I will be using this to plan my next quilt. Thank you!
Post a Comment
# posted by : 2:47 PM
: 2:47 PM << Home
![]()


![[HeettheFeet20083.jpg]](https://blogger.googleusercontent.com/img/b/R29vZ2xl/AVvXsEiCRH_T42wVcDuEXnRRcJTi8Xx0pZMjwaEvKKUYxkKGb3RbfVJvbBKJaplnruL4Y1lQGy9LWjb2KhOsPi10kdPRppP6_O47YprEco3m4iD3JMmT1o-7Hc6zuCWJT-0gxesUCp_H/s1600/HeettheFeet20083.jpg)
![[mittnz2008buttin.jpg]](https://blogger.googleusercontent.com/img/b/R29vZ2xl/AVvXsEjhkbBquqYIEHAWQxsnQtaptULuJ-jj-mlpdjbffH9r1n1liR1r8yRRkXMgJLBxbeo0x3w2wU_gLhjFzrxzKrMmVgUGSqAzkP89jlWOA04Xhr2pWmVGIDgt8VGWAK-FZMfwB6j6/s1600/mittnz2008buttin.jpg)
![[heet2009-1.jpg]](https://blogger.googleusercontent.com/img/b/R29vZ2xl/AVvXsEi4SiW5ds26X6RV2guuohZ5nCdtljV9Pj8cVQCebCBg8EYaQR_DXHlIgLihx-5ddowYTS8hM11_JCwqlbN0qLGhUHjIsea9xw5v9tu4Cdnn0dHCRU5NXLAN-VH_o7jT1WW3w74R_w/s320/heet2009-1.jpg)
![[mittnz 2009 button.jpg]](https://blogger.googleusercontent.com/img/b/R29vZ2xl/AVvXsEjpuGtaAayAUpfk3b8FnVyyIvB5jI1YxPMmcN2M9PyQo9MfDK9JVxgFz2z7rLFuGjebz7CBV-frRyUYMXFzFLmwtP_xmCwd9HEgKylZaZwzwfSV8xTZ5a6vayaG0oEbFxgjYFTa5w/s320/mittnz+2009+button.jpg)