Wednesday, December 07, 2005
Patterns
I finished another little scarf for the reservation and just has to share the recipe. It took me a couple of days, working on it between other projects (they're coming along nicely).
I used worsted weight yarn and size 10 needles. (Yes, they are bigger than the ball band suggests, I wanted a soft, squishy fabric.) The yarn is Bernat Ragg and I am nearly out (and it is very discontinued).

It starts out like the basic dishcloth: Cast on 3 stitches. Knit one row.
Then, using your favorite increase, increase 1 stitch at the beginning of the row. I used kfb (knit front and back). Knit to the end.
Repeat this row until you have 32 stitches.
Work even (knit every row) for 30 rows (15 ridges).
Switch to ribbing (knit 1, p1, repeat across row) and knit in ribbing for 2". You'll notice that the ribbing pulls the garter stitch in a bit.
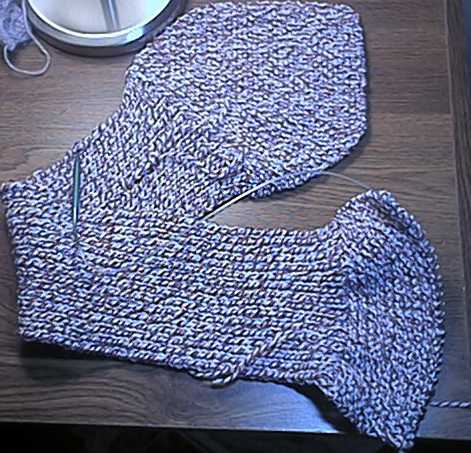
 Next, split the ribbing in half. Knit across 16 stitches, keeping the k1, p1 ribbing.
Join a new ball of yarn (or the opposite end of the ball you are using). To do this, just stop knitting with the working end that's attached to your knitting and start knitting with a new working end.
Work each half (16 stitches) independently until you have 2" worked (a total of 4 ribbed inches). Using the yarn attached at the outer edge, rib across all the stitches. Cut the extra yarn (the one attached in the middle), leaving a tail about 6-8" long (you'll weave this in later).

Continue ribbing for an additional length that is long enough to go around the neck of your victim (er, recipient) comfortably. (I continued for an additional 18" for a total ribbed section of 22"), then resume knitting in garter stitch (k every row).
You want to duplicate the shaping on the other end, so work in garter stitch for 30 rows (15 ridges).
Next, decrease 1 stitch at the beginning of every row, using a decrease that matches your increased (in other words, if you used a yo increase at the beginning, you'll use a yo decrease at this end). In the model: k1, k2 tog, k to end, repeat, until 3 stitches remain. (I like to do my decreases 1 stitch in from the edge. It makes a smoother edge.) Bind off.
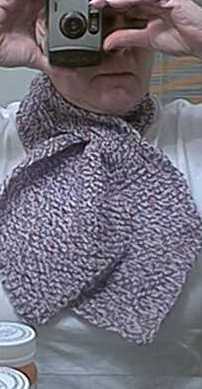
Weave in all ends neatly. Slip the end of the scarf through the slit created at the one end of the ribbing:

Take obligatory shot in the bathroom mirror.
Note: mission accomplished. It's nice and toasty and stays in place.
Note #2: It's a little thick and wide for a child. Perhaps an increase to 28 stitches on would be better.
Note 3: It looks a little "girly." Next one: Start with a cast on of the number of stitches desired (28, 32, 36--a multiple of 4 is needed to make the "split" work well) and skip the increases/decreases.
Note 4: the important one! This is my pattern (not my concept, lord knows, but my words and my photos).
If you want to make them for charity, family, friends, or yourself, be my guest. If you want to make them for sale, that's probably all right, too, but please ask. I may request that you make a small monetary donation to the nearest soup kitchen or emergency pantry for every one you sell. Be fair.
.
I used worsted weight yarn and size 10 needles. (Yes, they are bigger than the ball band suggests, I wanted a soft, squishy fabric.) The yarn is Bernat Ragg and I am nearly out (and it is very discontinued).

It starts out like the basic dishcloth: Cast on 3 stitches. Knit one row.
Then, using your favorite increase, increase 1 stitch at the beginning of the row. I used kfb (knit front and back). Knit to the end.
Repeat this row until you have 32 stitches.
Work even (knit every row) for 30 rows (15 ridges).
Switch to ribbing (knit 1, p1, repeat across row) and knit in ribbing for 2". You'll notice that the ribbing pulls the garter stitch in a bit.
 Next, split the ribbing in half. Knit across 16 stitches, keeping the k1, p1 ribbing.
Join a new ball of yarn (or the opposite end of the ball you are using). To do this, just stop knitting with the working end that's attached to your knitting and start knitting with a new working end.
Work each half (16 stitches) independently until you have 2" worked (a total of 4 ribbed inches). Using the yarn attached at the outer edge, rib across all the stitches. Cut the extra yarn (the one attached in the middle), leaving a tail about 6-8" long (you'll weave this in later).
Continue ribbing for an additional length that is long enough to go around the neck of your victim (er, recipient) comfortably. (I continued for an additional 18" for a total ribbed section of 22"), then resume knitting in garter stitch (k every row).
You want to duplicate the shaping on the other end, so work in garter stitch for 30 rows (15 ridges).
Next, decrease 1 stitch at the beginning of every row, using a decrease that matches your increased (in other words, if you used a yo increase at the beginning, you'll use a yo decrease at this end). In the model: k1, k2 tog, k to end, repeat, until 3 stitches remain. (I like to do my decreases 1 stitch in from the edge. It makes a smoother edge.) Bind off.
Weave in all ends neatly. Slip the end of the scarf through the slit created at the one end of the ribbing:
Take obligatory shot in the bathroom mirror.
Note: mission accomplished. It's nice and toasty and stays in place.
Note #2: It's a little thick and wide for a child. Perhaps an increase to 28 stitches on would be better.
Note 3: It looks a little "girly." Next one: Start with a cast on of the number of stitches desired (28, 32, 36--a multiple of 4 is needed to make the "split" work well) and skip the increases/decreases.
Note 4: the important one! This is my pattern (not my concept, lord knows, but my words and my photos).
If you want to make them for charity, family, friends, or yourself, be my guest. If you want to make them for sale, that's probably all right, too, but please ask. I may request that you make a small monetary donation to the nearest soup kitchen or emergency pantry for every one you sell. Be fair.
.
Labels: knit recipes
![]()


![[HeettheFeet20083.jpg]](http://bp3.blogger.com/_2rpM60RVRKg/R4AAQIa5PrI/AAAAAAAABYU/ANirq5Biaxo/s1600/HeettheFeet20083.jpg)
![[mittnz2008buttin.jpg]](http://bp2.blogger.com/_2rpM60RVRKg/R-VkTHBTOPI/AAAAAAAABo0/MGsDqe3KNQs/s1600/mittnz2008buttin.jpg)
![[heet2009-1.jpg]](http://2.bp.blogspot.com/_2rpM60RVRKg/SVz1AypoM_I/AAAAAAAAC-I/KUzNkEExe18/s320/heet2009-1.jpg)
![[mittnz 2009 button.jpg]](http://4.bp.blogspot.com/_2rpM60RVRKg/SeHvxh4aRxI/AAAAAAAADKw/RZrALPgLZL8/s320/mittnz+2009+button.jpg)